

Tactiques Defensives

|
We'll start by looking at defensive set-ups; after all games are won by your defence (or so they tell me). All you know about your opponent when you're kicking off is if their playing a Strength or Agility team: it doesn't matter which we deal with first. Astute Coaches will note by the end of this section that in Defence against Stronger teams the opposing team's speed dictates your set-up whereas in the Defence against Agility teams your speed should dictate your set-up. DEFENCE AGAINST STRENGTH TEAMS
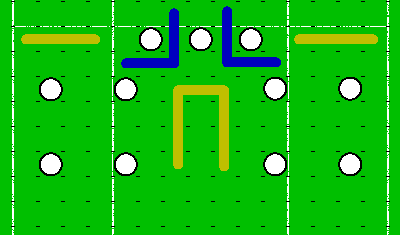
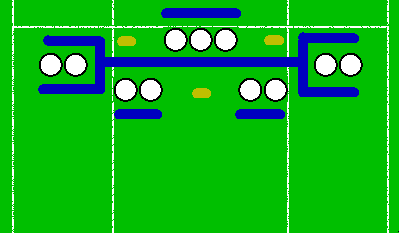
This defence is what we call a 3-4-4. The idea being that you group your players for mutual protection rather than to force your opponent to throw lots of dice while dodging. (You'd want a Defence Against Agility Teams for that!) There are two main options you can play: the spread 3-4-4 (top) which allows partial defence against an unexpected running play; or the Flattened 3-4-4 which is an extreme example. The Flattened 3-4-4 is played against really slow teams such as the Undead or Dwarfs whereas the other would be used when facing Orcs. You will notice that the 3-4-4 allows only three Block actions from the Offence -- this should minimise your Turn 1 casualties and allow a weightier response to your opponent. TURN PROGRESSION What you need to do is force your opponent into making Blitz moves only to further the forward progress of his players - the less Blocks he manages, the less your players get carried off the field; leaving more of your Defence left to prevent the score! This is achieved by getting your guys out of his forward Tackle Zones (TZ's), but keeping them with only one square between them and their opponent; easier for those teams with a higher Agility (AG) really! This should go on until you're ready to drop (in which case try Letting Them Score) or until the half finishes. But surely you can give a bit of grief as well as receive some? Sure you can. If you've got a couple of players standing waiting to take a pounding why not let them outflank your opponent, running around to any weak spots you may have noticed in his Cage. This serves a twofold purpose -- not only do you actually threaten to 'pop' the Cage (and hopefully turnover the ball!), but it also forces your opponent to respond by peeling players from the forward motion of his play, slowing the momentum further! DEFENCE AGAINST AGILITY TEAMS
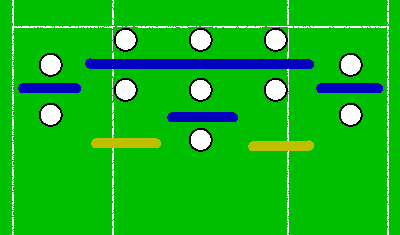
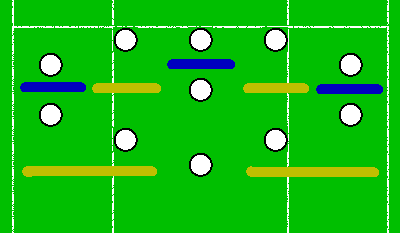
I call this defence a 5-5-1; with the 5's being concave across the field (Harald prefers a 3-2-3-2-1, but the 5-5-1 can be tweaked to fit both of the diagrams above). The aim of this defence is to lay down a net of TZ's in such a way as to give even a Gutter Runner a hard time; weigh the odds against their dice as it's the only defence you have in their Turn 1. Again you will notice that there is a Flattened 5-5-1 (top) and a Spread 5-5-1. The Flattened 5-5-1 is of more use if you want to lay down intersecting TZ's (there are five areas on the pitch with overlapping TZ's); however you are giving up the backfield response by doing this (a compromise would be to drop the back 1 further into your own territory; just make sure it's a Blitzer!). The Spread 5-5-3 allows deep-field response to penetrating dodgers - particularly handy if you're playing a slow moving team: a Dwarf Longbeard would find it difficult to drop back from the Flattened 5-5-1 to Blitz a ball carrier threatening the Touchdown. Use the Flattened 5-5-1 if you have a fast team and the Spread 5-5-1 if your players are slow. Again the 5-5-3 only allows three Blocks on Turn 1 for the Offence. Although you don't need to worry about attrition as much as with Strength teams, you shouldn't present unnecessary Blocking opportunities unless you have to. TURN PROGRESSION All you can do in their Turn 1 is rely on your chosen defence to force as many Dodge rolls as possible; the faster they use their Team and Dodge Rerolls the better. Your Turn 1 is rather crucial as your opponent intends to score in their Turn 2 (unless they're trying to Run Out the Clock). Your Defence must be fluid enough to either throw Blocks on any opposition player within range of the TD (discounting Event Cards) or get close enough to them to cover them in TZ's; making it statistically improbable that they can Catch and Dodge with any success. These TZ's should be lain between their opponent and the Endzone. Meanwhile your Line of Scrimmage (LoS) players will probably serve you best by splitting into two groups: Group 1 will seal the eligible Passing Lanes to your opponents receivers. This way you can try for an Interception or if you have lower AG players they should lay more TZ's onto their opponents; this time to their opponents sides or rear. Group 2, ideally consisting of two or three Ball Retrieval players, will put pressure on the Ball carrier or generally make a nuisance of themselves by laying TZ's onto eligible Hand Off players. Be aware that the Thrower may not pass directly to the eligible TD receiver (more on this in Offence for Agility Teams). The odds are in the favour of the Agility team scoring so don't be demoralised by this. After all if you play an Agility team then you can expect to score at the same rate; if you Coach a Strength team then take solace in pounding them into the dust while they score! |

© VFL 1999-11-01T18:00 CEST


